Tuesday, April 28, 2020

The Glazing Process...

Just showing the time and process that 
goes into my creations.
Many times potters have large batches
of glazes mixed up in 5 gallon buckets
they simply dip the bowl in and Wala- all done.
For me that is not the case.  I hand brush
all my details on in a minimum of 3 layers.
I have to carefully brush around all
the details I created and not have it carry
over into the other color.
It does not matter if I paint over a drip
because that drip will come to the 
surface when fired and be
where I don't want it to be.
I work on this in the evening after my day job....
My time at work is literally
percolating ideas of what I can create
and do when I am off.
I know it sounds like a crap way to spend your day
but I only have 3 yrs. to go!
and then I can do what I want and collect
my pension and health insurance! 
 
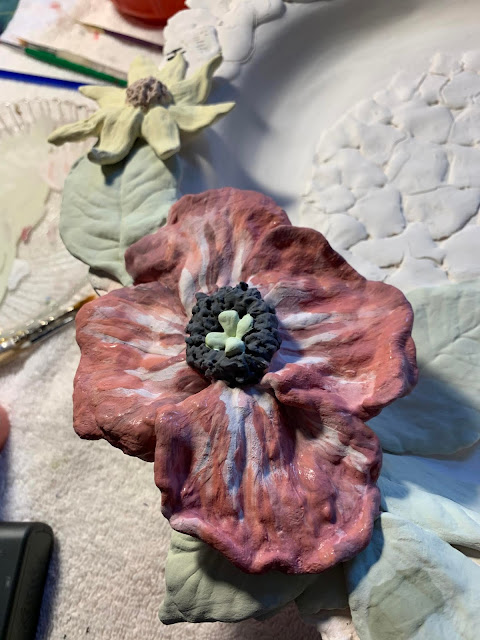
So at any rate, you can see
 the evolution from simple
colored flowers....

to the detail which is applied to this
poppy after the first 3 layers of color.
I keep a log of how I applied
my bowl layers so that I have a
record of how and what I applied,
in case I really love it and want to do it again!
Then I basically hope for the best
and that it will come out
like I envisioned!



Sunday, April 19, 2020

New Items in Etsy

These items are available in Etsy... 
I love how this Robin bird bath came out.
He is the first bird I sculpted with little feet.
The feet are submerged when
the bowl is filled with water.
I put a lot of detail into sculpting him.
Notice his tail feathers.
He was sculpted from a clump of clay
and then the interior of his
body was sculpted out.  This is to 
insure he doesn't explode in the 
firing in the kiln.
the first time I used the base color on this bowl.
I like how the coloring came out.

Here's a miniature sunflower bowl...

 A hanging butterfly feeder/waterer


Tuesday, April 14, 2020

New yard plans

With spring here we are trying to implement
some of our yard plans.  It's not an easy
task with some of the ridiculous restrictions
on what can be purchased for your home.
Above is my plan after many changes and I
have already changed again where the raised
garden beds with be. They will be more on the right
side of the yard than the left side.  This way when
the trees in the neighbors yard grow they won't
shade the garden.
 This is the front of the house.
It's ok, but a little bla for me.
I wanted to add another bed .  This way I can add
perennials and bulbs to add 
some interest through the seasons.
My husband removed all the sod by hand.
 We then put weed cloth down so nothing
would grow up into the new bed.  The goal is
to keep it weed free and make it easy in the future.
 All the brick stones had to be
leveled as the front yard slopes
toward the street.
 Then it took 7 pickup beds of dirt to fill it up.
Just as soon as it's warm enough and I
can go to the nursery to shop for plants 
This bed at least is ready.

Friday, April 10, 2020

Not Quarantined...


I wish I could say I was quarantined but I am not.  My 
husband and I are both deemed essential workers,
so really not that much has changed from our daily routines.

Honestly,I would love to be able to stay home
and have so much extra time to work on projects.
I am thankful though that we are not loosing 
pay or jobs like so many people are.  I am
Thankful for my blessings and my families health.

So I am just trying to fit in projects
after work or on the weekends.
Hopefully this weekend
I will be able to run my kiln.
This is a large Robin bird bath.  I sculpted
everything by hand and hollowed out
the robin.

The detail in this one took quite a while.
He's my first bird with little feet.